
In the past, we wrote an article about boutonnières and lapel vases. In order to wear these two accessories, a jacket needs a boutonniere loop on the backside of the lapel, underneath the buttonhole, to keep the flower safely in place. Typically only bespoke jackets or some very pricey ready-to-wear garments feature such a loop.

Now, if you plan to wear a boutonniere, but you are one of the many whose jacket does not have a loop, you have two options: You could either bring it your tailor (some alterations tailors may not even know what you are talking about) or you do it yourself. In fact, it requires neither a tool shed nor expert sewing skills to create a nice little loop. In the following article, I will show you how I add a neat looking loop to the back of a lapel in just a few minutes. Although I consider it to be a very simple task, please bear in mind that you do so at your own risk. Firstly, you need a needle, some thread, and scissors. For this particular loop, I chose a thicker thread that will provide a nice color contrast to the fabric. This way, the loop will be easier to construct and sturdier in the long run. The thimble is optional.
If you want to wear boutonnières but you don’t have a skilled florist or you are tired of wilting boutonnières, then take a look at these silk boutonnières that look just like the real thing.
Secondly, decide where you want your loop to be. In my opinion, the loop should be placed at about 1 inch under the buttonhole. The angle of the loop is not too important, you just have to be able to put your boutonniere through your buttonhole and the loop later.

Third, thread the needle and make a knot at the end. Now, insert it between the layers of fabric about half an inch away from the position where you want your loop to be, and come out of the fabric at that position. Make sure that nothing is visible from the front side of the lapel.


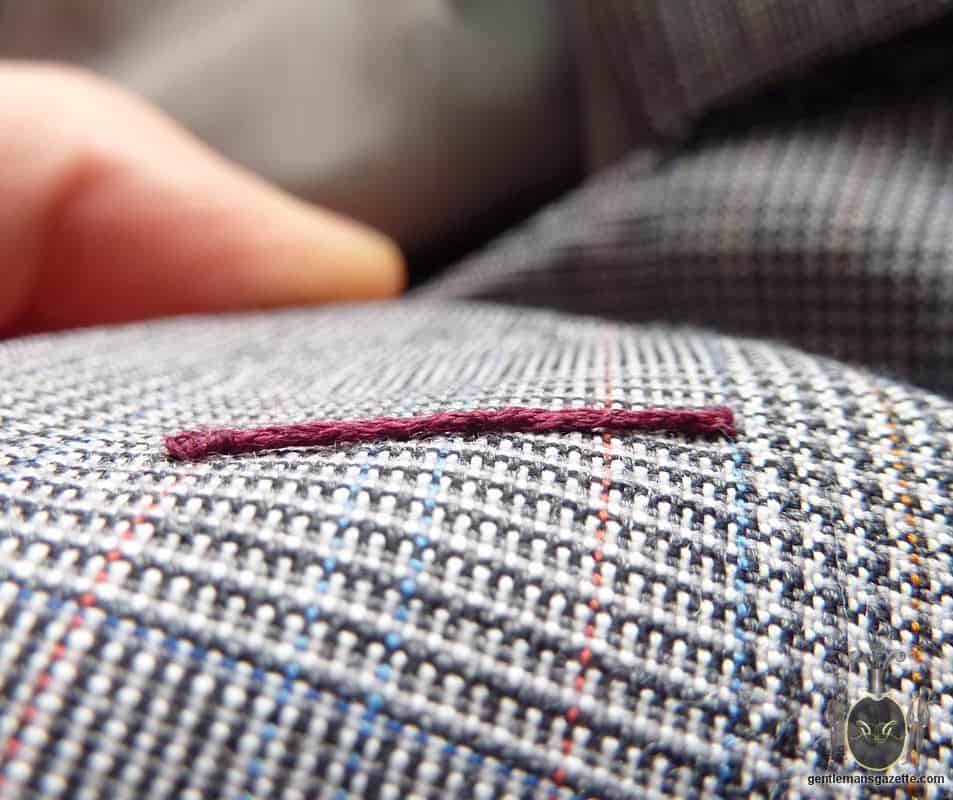
Now, make a stitch, form a loop and tie a knot. Repeat this two to three times.


Once you are done with that, pinch the fabric together with your fingers, and pull on the knot that is about half an inch away. Cut the thread very close the the fabric and the remaining thread will disappear between the layers.


Make another stitch, then pull the thread so it lays flat. Form a loop and tie a knot at the position where you want your boutonnière’s loop to end. If you have thin thread, you can go back to the other end of the loop, tie a knot, and come back again and tie a knot. I did not do that in this picture because I thought it was thick enough.


Now, wrap the thread by looping the needle under and around the boutonniere loop about 8 times.


Tie a knot and wrap it around in the same manner, in the opposite direction.

Tie another knot once you have reached the other side. Your boutonniere loop is almost done by now.

Based on the thickness of your loop and thread, determine if yours is sturdy enough to hold a flower. I realized that I wanted it to be a little thicker. If this is also your assessment, repeat the steps of tying a knot and looping the thread until you reach the desired thickness.

Almost done!
Once more, insert the needle in between the layers and resurface somewhere about half an inch away.


Pinch the fabric together and cut the thread very close to the cloth. Again, the rest of thread will disappear in between the layers.

Done!

Check the front of the lapel – everything looks fine.


Here are two other boutonniere loops from A. Caraceni. As you can see, they must be both strong and functional.

Here are two other boutonniere loops from A. Caraceni. As you can see, they must be both strong and functional.
I hope this picture series will help you in making your own boutonniere loop. As you can see, it is quite simple and it really does not take very long.
Good luck with your boutonniere loop and please let me know if you have any questions or send me a picture of your results!
I’m going to leave you with a post from another blog I found interesting – it’s about real flowers pinned on lapels. Not sure if I have the guts for that myself, though.
http://fineanddandyshop.blogspot.com/2010/06/guest-dandy-flower-power.html